Frontend development
The Home Assistant frontend is built using web components. For more background about our technology choices, see this blog post.
Do not use development mode in production. Home Assistant uses aggressive caching to improve the mobile experience. This is disabled during development so that you do not have to restart the server in between changes.
Setting up the environment
Follow our devcontainer development environment guide to set up a proper development environment first.
Getting the code
The first step is to fork the frontend repository and add the upstream remote. You can place the forked repository anywhere on your system.
git clone [email protected]:YOUR_GIT_USERNAME/frontend.git
cd frontend
git remote add upstream https://github.com/home-assistant/frontend.git
Configuring Home Assistant
You will need to have an instance of Home Assistant set up. For a development instance see our guide on setting up a development environment.
There are two ways to test the frontend. You either run a development instance Home Assistant Core, or you configure the frontend to connect to an existing Home Assistant instance. The first option is how it will work in production. The second allows running a development frontend against an existing Home Assistant with minimal interference. The downside is that not everything can be tested this way. For example, the login page will always be the one built-in into your Home Assistant.
- With a dev instance of HA Core
- With a production instance of HA Core
Developing with Visual Studio Code + dev container
To configure Home Assistant to use the development mode for the frontend, update the frontend config in your configuration.yaml and set the path to the frontend repository that you cloned in the last step:
If you are using Visual Studio Code with dev containers for Home Assistant Core, you need to mount the frontend repository into the dev container. Add the following section to .devcontainer/devcontainer.json in the Home Assistant Core repository:
"mounts": [
  "source=/path/to/hass/frontend,target=/workspaces/frontend,type=bind,consistency=cached"
]
Rebuild the dev container by pressing Shift+Command+P (Mac) / Ctrl+Shift+P (Windows/Linux) to open the Command Palette, then selecting the Dev Containers: Rebuild Container command.
Edit config/configuration.yaml at the root of the Home Assistant Core repository to add this entry:
frontend:
  development_repo: /workspaces/frontend
This is the mounted path inside the dev container, see the target parameter above. If the source path is incorrect, the web frontend won't work.
Run Home Assistant Core from VS Code:
- Open the Command Palette:
- Mac:
Shift+Command+P - Windows/Linux:
Ctrl+Shift+P
- Mac:
- Select Tasks: Run Task
- Select Run Home Assistant Core
The change to .devcontainer/devcontainer.json should be excluded from any PR as it contains your local path to the frontend repository. Since the settings in .devcontainer/devcontainer.json are only processed during the container rebuild, you can safely roll back the change after the rebuild has completed.
Developing with a manual environment
If you set up the development environment for Home Assistant Core manually, fill in the frontend repository path in configuration.yaml:
frontend:
  # Example path: /home/paulus/dev/hass/frontend
  development_repo: /path/to/hass/frontend
The configuration.yaml file can be found in the config directory at the root of the Home Assistant Core repository. If the path is incorrect or otherwise inaccessible, the web frontend won't work.
If you want to connect your development frontend to an existing home assistant instance without replacing the UI completely, you will need to add the url under which your development frontend is hosted in configuration.yaml of the home assistant it will be connecting to. Like this:
http:
  cors_allowed_origins:
    - http://localhost:8124
Once the frontend development environment is set up (see the Development section), you can use the following command as a replacement for the standard dev server. It develops and runs the frontend on http://localhost:8124 and connects to the Home Assistant running on http://localhost:8123. Note that if you are running this command from a devcontainer, the url should be accessible from the container host.
yarn dev:serve
You can change the Home Assistant url the frontend connects to by passing the -c option. This will also work for existing production core instances. It does not need to be a development version hosted locally. However, if you change the value for this option you will need to logout from your development frontend before it actually switches to the new value. For example:
yarn dev:serve -c http://homeassistant.local
You can change the port the frontend is served on by passing the -p option. Note that if you are running from a devcontainer, you will need to setup
port forwarding as well if you want to access it from the container host. For example:
yarn dev:serve -p 8654
If you connect to a production instance of Home Assistant and change the port with -p, make sure cors_allowed_origins includes the frontend origin with the matching port. For the yarn dev:serve -p 8654 example above, add http://localhost:8654 instead of http://localhost:8124.
It also accepts the background lifecycle flags described in Managing the dev server in the background.
Installing Node.js (manual environment only)
Node.js is required to build the frontend. The preferred method of installing node.js is with nvm. Install nvm using the instructions in the README, and install the correct node.js by running the following command:
nvm install
Yarn is used as the package manager for node modules. Install yarn using the instructions here.
Install development dependencies
Bootstrap the frontend development environment by installing development dependencies.
nvm use
script/bootstrap
If you are using a development container, run these commands inside the container.
Development
Run development server
Run this command to build the frontend and run a development server:
nvm use
yarn dev --fetch-translations
When the build has completed, and Home Assistant Core has been set up correctly, the frontend will be accessible at http://localhost:8123. The server will automatically rebuild the frontend when you make changes to the source files.
yarn dev is a wrapper around the script/develop script. Both still work, but yarn dev adds the background lifecycle flags described below.
Run development frontend over existing HA instance
Run this command to start the development server:
nvm use
yarn dev:serve --fetch-translations -c http://homeassistant.local
You may need to replace http://homeassistant.local with your local Home Assistant url. http://homeassistant.local assumes a Home Assistant OS installation using the default port 80; older installations and other installation types typically use port 8123 (e.g. http://homeassistant.local:8123).
Managing the dev server in the background
Both dev servers above (along with the demo, gallery, and end-to-end test app dev servers below) accept a set of lifecycle flags. This lets you start a server, leave it running, and manage it later without keeping a terminal session attached:
| Flag | What it does |
|---|---|
--background | Start the server detached, wait until it is ready, print its URL (when it has one) and pid, then exit and leave it running. |
--status | Report whether the dev server is running. |
--logs [--follow] | Print the dev server log, or tail it with --follow. |
--stop | Stop a running background dev server. |
The app, locally served app, demo, and gallery commands also accept --fetch-translations. This fetches the latest translations before starting the server and prompts for GitHub authorization when no saved token is available. Translation fetching runs under the same workflow lock in foreground and background modes.
If a previous authorization no longer works (for example, you see a "Bad Credentials" error), delete translations/token.json and start one of these commands with --fetch-translations again.
For example:
yarn dev:serve --background    # start it and detach
yarn dev:serve --logs --follow # watch the output
yarn dev:serve --stop          # stop it again
Each dev server listens on its own port:
| Command | Port | Purpose |
|---|---|---|
yarn dev | 8123 | The app, served by a running Home Assistant Core (development_repo). |
yarn dev:serve | 8124 | The app, served locally over an existing Home Assistant instance. |
yarn dev:demo | 8090 | The demo. |
yarn dev:gallery | 8100 | The design gallery. |
yarn test:e2e:app:dev | 8095 | The stripped-down app used by the end-to-end tests. |
These managed Yarn development workflows, together with yarn build and yarn build --modern, share one workflow lock. Starting the same development workflow again reports the running server and succeeds. Starting another managed workflow while one is active is blocked and reports the active workflow with the relevant status, logs, or stop command.
When a coding agent is detected, yarn dev:* runs in the background automatically so it does not block the agent's session. Set HA_DEV_BACKGROUND=0 to force the dev server to run in the foreground.
A cold build waits up to 180 seconds to become ready; override this with HA_DEV_SERVER_TIMEOUT (in seconds).
Background logs are written under node_modules/.cache/ha-dev-server/.
Browser settings
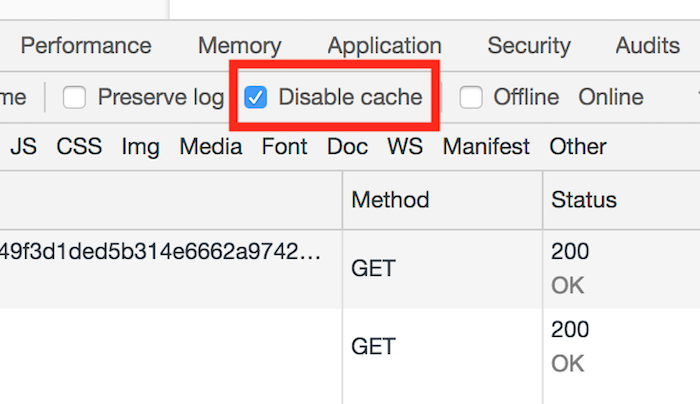
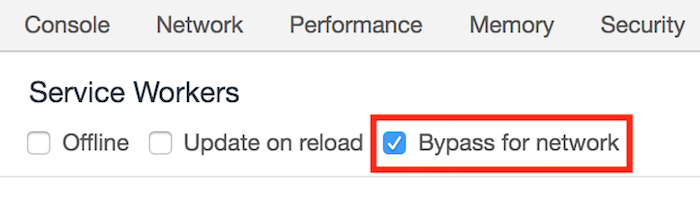
Open Google Chrome's Developer tools, and make sure you have cache disabled and correct settings to avoid stale content:
Instructions are for Google Chrome based browsers but are applicable to other browsers as well. You should find similar settings in your browser of choice.
- Disable cache by ticking the box in Network > Disable cache
- Enable Bypass for network in Application > Service Workers > Bypass for network
Testing
Before opening a pull request, run the linters and tests. These commands are all run from the frontend repository.
Linting and formatting
yarn lint       # ESLint, Prettier, TypeScript, and Lit analyzer
yarn format     # auto-fix ESLint and Prettier issues
yarn lint:types # run only the TypeScript compiler
Always run yarn lint:types (and tsc) without file arguments. Passing a filename (for example yarn lint:types src/file.ts) makes tsc ignore tsconfig.json and emit a compiled .js file next to each .ts source in src/, polluting the source tree. If this happens, delete the stray files with git clean -fd src/.
Unit tests
Unit tests run with Vitest:
yarn test            # run the unit tests
yarn test:coverage   # run them with a coverage report
End-to-end tests
End-to-end tests run with Playwright, split into three suites that each have their own dev server:
- App: the main app, tested against a stripped-down harness built just for the end-to-end tests.
- Demo: the demo.
- Gallery: the design gallery.
| Suite | Dev server | Test command | Runs on Port |
|---|---|---|---|
| App | yarn test:e2e:app:dev | yarn test:e2e:app | 8095 |
| Demo | yarn dev:demo | yarn test:e2e:demo | 8090 |
| Gallery | yarn dev:gallery | yarn test:e2e:gallery | 8100 |
Start the suite's dev server first (ideally with background lifecycle flags), then run the suite. Playwright reuses a dev server already running on the port instead of doing a slow full build, and the watcher recompiles on save, so you can iterate without restarting anything:
# App
yarn test:e2e:app:dev --background   # start the dev server and detach
yarn test:e2e:app                    # run the suite

# Demo
yarn dev:demo --background
yarn test:e2e:demo

# Gallery
yarn dev:gallery --background
yarn test:e2e:gallery
Narrow a run to matching tests with -g, and to a single project with --project:
yarn test:e2e:app -g "more-info" --project=chromium       # Desktop Chromium (matching "more-info")
yarn test:e2e:app -g "more-info" --project=mobile-chrome  # Pixel 7 (matching "more-info")
yarn test:e2e runs all three suites, and yarn test:e2e:show-report opens the combined HTML report.
Creating pull requests
If you're planning on issuing a PR back to the Home Assistant codebase you need to fork the frontend project and add your fork as a remote to the Home Assistant frontend repo.
git remote add fork <github URL to your fork>
When you've made your changes and are ready to push them change to the working directory for the frontend project and then push your changes
git add -A
git commit -m "Added new feature X"
git push -u fork HEAD
Building the frontend
If you're making changes to the way the frontend is packaged, it might be necessary to try out a new packaged build of the frontend in the main repository (instead of pointing it at the frontend repo). Run a full production build from the frontend repository with:
yarn build
Production builds can also run as managed background processes:
yarn build --background    # start a full build and detach
yarn build --status        # report whether a build is running
yarn build --logs          # print the background build log
yarn build --logs --follow # follow the background build log
yarn build --stop          # stop a running background build
Use yarn build --modern when packaging, bundle-size, or browser performance work only needs the modern frontend_latest bundle. Add --background to run the modern-only build as a managed background process.
A managed production build cannot run at the same time as a managed development server. Before starting a different managed workflow, stop the active workflow with its corresponding --stop command.
To test it out inside Home Assistant, run the following command from the main Home Assistant repository:
pip3 install -e /path/to/hass/frontend/ --config-settings editable_mode=compat
hass --skip-pip-packages home-assistant-frontend
Test an existing PR
Sometimes you need to test frontend changes on different environments or without setting up a full development environment. For example, you may want to test changes on a Home Assistant OS instance, or verify a fix works in your specific setup before the PR is merged.
The development_pr option allows you to easily test frontend PRs by automatically downloading and using the frontend artifact from GitHub.
Configuration
To use this feature, you need both a PR number and a GitHub token.
Creating a GitHub token
- Go to GitHub Settings > Developer Settings > Personal Access Tokens > Fine-grained tokens
- Click "Generate new token"
- Give it a descriptive name like "Home Assistant Frontend Testing"
- Set the expiration date (recommended: 90 days or less)
- Under "Repository access", select "Public Repositories (read-only)"
- Skip the 'Permissions' section (leave it empty)
- Click "Generate token"
- Copy the token immediately (you won't be able to see it again)
Configuration in Home Assistant
Add the following to your configuration.yaml:
frontend:
  development_pr: <PR_NUMBER>
  github_token: <YOUR_GITHUB_TOKEN>
For example, to test PR #12345:
frontend:
  development_pr: 12345
  github_token: ghp_your_token_here
After adding this configuration, restart Home Assistant for the changes to take effect.
Keep your GitHub token secure. Do not commit it to version control or share it publicly.
Reverting to the production frontend
To stop using the PR build and return to the standard Home Assistant frontend:
- Remove the
development_prandgithub_tokenlines from yourconfiguration.yaml - Restart Home Assistant
Home Assistant will automatically return to using the built-in production frontend.
How it works
When you configure development_pr, Home Assistant downloads the frontend build artifact from the specified PR on GitHub during startup and uses it instead of the production version. The artifact is cached locally and, on subsequent restarts, Home Assistant checks if the PR has new commits by comparing SHA sums. If a newer version is found, it downloads the updated artifact automatically.
If you have both development_repo and development_pr configured, development_repo takes precedence. The local development repository will be used instead of the PR build.
Use cases
This is particularly useful for:
- Testing on HAOS: Test PRs on Home Assistant OS without needing a development setup
- Environment-specific testing: Verify that a fix works on your specific hardware, network, or browser configuration
- Quick verification: Test a fix or feature without cloning repositories and building the frontend locally
Limitations
- The PR must have a successful build with artifacts available on GitHub
- Frontend artifacts are only available for 7 days after the PR build completes
- This is intended for testing only and should not be used in production
Recreating the artifact
This can be useful if the artifact isn't available anymore, because it's older then 7 days or you want to test new upstream changes in the PR.
If you are the author of the PR, you can trigger a new artifact by:
- Update your branch — either by merging the
devbranch into it or rebasing on top of the latestdevbranch. This will trigger the build pipeline and create a new artifact that Home Assistant can download. - Close and reopen the PR to trigger a new build.
If you are not the author, you can ask them to update their PR branch to trigger a new build.
To use the new artifact you have to restart Home Assistant core